Advertisement
Working with machine learning often feels like tinkering with a puzzle that keeps changing. You adjust layers, tweak optimizers, tune hyperparameters, but sometimes the key lies in shaping how your model learns—and that's what loss functions do. A loss function measures how far off your model's predictions are from the actual answers.
TensorFlow comes with many ready-made loss functions, but they don't always fit every situation. Writing your own can seem intimidating if you're just starting. This guide explains, in simple and direct language, how to write a custom loss function in TensorFlow, step by step, without getting buried in theory or jargon.
Before writing one, you need to understand what goes into a loss function. Every loss function takes two arguments: y_true and y_pred. Both are tensors, which means you can apply TensorFlow operations directly on them without conversion. Your function should return a single value — either a scalar loss or a tensor that can be averaged over the batch effectively.
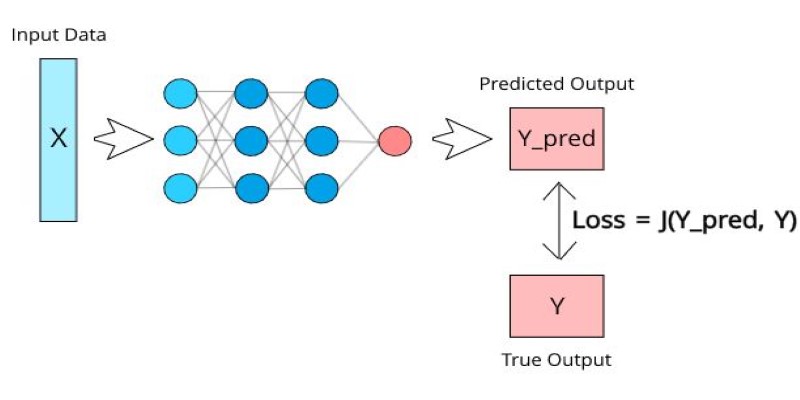
For example, in a classification problem, y_true might be [1, 0, 0] and y_pred might be [0.8, 0.1, 0.1]. A simple loss function would measure how far these two are apart and output that number for optimization and training guidance.
The easiest way to define a custom loss function in TensorFlow is by writing a Python function and passing it to your model during compilation. TensorFlow’s backend functions (like tf.reduce_mean, tf.square, etc.) make it possible to manipulate tensors easily.
Here’s an example of a mean squared error implemented by hand:
import tensorflow as tf
def custom_mse(y_true, y_pred):
return tf.reduce_mean(tf.square(y_true - y_pred))
This function calculates the square of the difference between predictions and actual labels, then averages it over the batch. You can use it directly:
python
CopyEdit
model.compile(optimizer='adam', loss=custom_mse)
That’s really all there is to it for simple use cases. You can now define anything you need, like adding penalties for over-prediction, ignoring certain classes, or weighting some examples more than others, as long as it returns a single value.
Sometimes your loss function needs extra parameters. For example, maybe you want to apply different weights to positive and negative examples. Since the loss function passed to compile() can only accept two arguments, the trick is to write a function that returns a function.
Here's a weighted binary cross-entropy example:
def weighted_binary_crossentropy(weight):
def loss(y_true, y_pred):
bce = tf.keras.losses.binary_crossentropy(y_true, y_pred)
return tf.reduce_mean(bce * weight)
return loss
Then you can pass it like this:
model.compile(optimizer='adam', loss=weighted_binary_crossentropy(0.7))
This approach lets you make your custom loss function more flexible, adaptable, and reusable without breaking TensorFlow’s expected signature.

If you want your loss function to keep track of state or integrate neatly into TensorFlow’s metrics and callbacks, you can write it as a subclass of tf.keras.losses.Loss. This is more advanced but not much harder, and it provides flexibility for future modifications and consistent behavior.
Here's how it looks:
class CustomHuberLoss(tf.keras.losses.Loss):
def __init__(self, delta=1.0, name="custom_huber_loss"):
super().__init__(name=name)
self.delta = delta
def call(self, y_true, y_pred):
error = y_true - y_pred
is_small_error = tf.abs(error) <= self.delta
squared_loss = tf.square(error) / 2
linear_loss = self.delta * (tf.abs(error) - self.delta / 2)
return tf.where(is_small_error, squared_loss, linear_loss)
You can then use it during compilation:
model.compile(optimizer='adam', loss=CustomHuberLoss(delta=1.0))
Writing your loss this way gives you more control and allows your loss function to be serialized and saved with the model reliably. It’s handy if you plan to deploy or share your models in production environments seamlessly.
It’s a good idea to test your loss function on dummy data before plugging it into a model. For example:
y_true = tf.constant([[1.0], [0.0]])
y_pred = tf.constant([[0.8], [0.2]])
loss_value = custom_mse(y_true, y_pred)
print(loss_value.numpy())
This lets you see if it behaves as expected and returns reasonable numbers. Debugging becomes much simpler if you test it in isolation first using varied sample values and shapes.
When creating a custom loss function, always rely on TensorFlow operations (tf.*) instead of standard Python math. This keeps the calculations within TensorFlow’s computational graph, which is necessary for GPU acceleration and automatic differentiation. Using .numpy() or other eager methods inside your loss will break the graph and stop gradients from flowing properly. Make sure every part of your function is differentiable so TensorFlow can compute gradients during training.
Another common oversight is returning a loss tensor with shape (batch_size,) rather than reducing it to a single scalar value. Most optimizers expect the loss to represent an average or total over the batch. Use tf.reduce_mean() if you want the average loss per sample, or tf.reduce_sum() if you prefer the total. Forgetting this reduction can cause shape mismatches or unexpected learning behavior. Testing your function separately on dummy data helps catch these issues before you train your model.
Writing a custom loss function in TensorFlow doesn’t have to feel technical or overwhelming. At its core, it’s about clearly telling your model how to measure its own mistakes in a way that fits your specific problem. Start simple, test thoroughly, and only move to advanced class-based designs when your use case demands it. Keep in mind the basic requirements: use TensorFlow operations, return a scalar value, and always test on dummy data to verify correctness and expected behavior. Whether you’re adjusting weights, designing entirely new metrics, or experimenting with unconventional creative ideas, creating your own loss function gives you full control over how your model learns. With practice, you’ll find it a flexible and effective way to improve your results and tailor your models to your unique tasks.
Advertisement

Google debuts new tools and an agent protocol to simplify the creation and management of AI-powered agents.

Explore how generative AI in financial services and other sectors drives growth, efficiency, and smarter decisions worldwide

Meta introduces Llama 4, intensifying the competition in the open-source AI model space with powerful upgrades.

Understand what machine learning (ML) is, its major types, why it is so important, how it works, and more in detail here

How to write a custom loss function in TensorFlow with this clear, step-by-step guide. Perfect for beginners who want to create tailored loss functions for their models

Learn how to delete your ChatGPT history and manage your ChatGPT data securely. Step-by-step guide for removing past conversations and protecting your privacy
Confused between lazy learning and eager learning? Explore the differences between these two approaches and discover when to use each for optimal performance in machine learning tasks

What loss functions are, why they matter, and how they guide machine learning models to make better predictions. A beginner-friendly explanation with examples and insights

A Nvidia AI-powered humanoid robot is now serving coffee to visitors in Las Vegas, blending advanced robotics with natural human interaction in a café setting

Want OpenAI-style chat APIs without the lock-in? Hugging Face’s new Messages API lets you work with open LLMs using familiar role-based message formats—no hacks required

Tech giants respond to state-level AI policies, advocating for unified federal rules to guide responsible AI use.

How Locally Linear Embedding helps simplify high-dimensional data by preserving local structure and revealing hidden patterns without forcing assumptions